How to Access and Use Device Manager Tool in Windows 10
A driver is a software that makes an installed or attached hardware work. Without the proper driver, a hardware would not work since it won’t be able to have a software that will communicate with the operating system.
How to Access Device Manager Tool in Windows 10
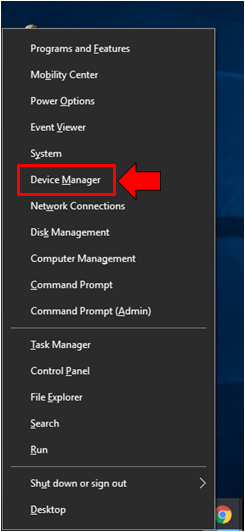
To launch this, all you need to do is press the Windows + X keys and the menu should appear on the bottom-left portion of your computer screen as you can see on the screenshot below.
How to Find Devices that Lack Driver in Device Manager
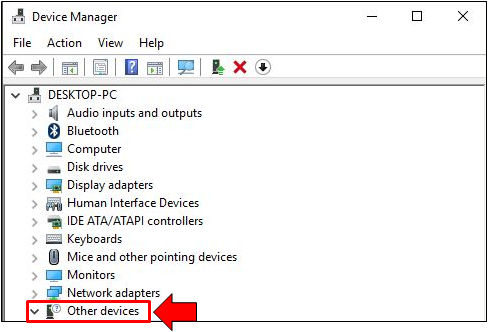
Finding hardware that don’t have the right driver installed is very easy if you use the Device Manager tool. After all, it is meant to do this and is designed to detect malfunctioning or non-functioning hardware so you can find and install the right driver for them or fix any problem that a certain system component/hardware is currently having. To look for these useless hardware (those that lack drivers to work), you will simply need to look for an item on the list of all the hardware attached or built-in with your computer which is labelled “Other devices” as you can see on the screenshot below.
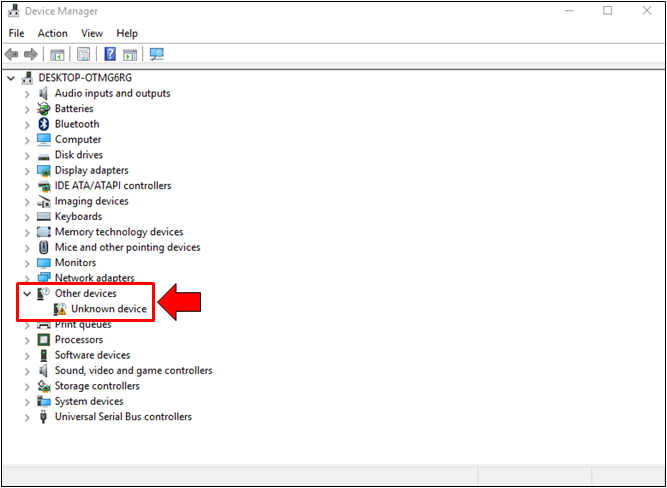
Clicking on this “Other devices” item from the list will cause it to expand and show all the hardware that currently don’t have the proper driver for them to work. These devices should be labelled as “Unknown device” as shown below and its icon should have a yellow triangular overlay on it that contains an exclamation mark in it.
If your computer has all the required drivers for all the hardware that it has, this “Other devices” item should not appear anywhere in this list but if you found it after you launched the Device Manager tool in your Windows 10 machine, it means that there is something that is built-in or attached to your computer which needs a driver and you will need to install the drive itself for the hardware to work. If you don’t have a clue on how this is done, we’re going to show the steps next so just read on.
How to Install Driver for an Unknown Device
As we have mentioned earlier, finding the “Other devices” item from the list of hardware that is attached or built-in with your computer means that there is something that needs a driver. The hardware will just appear as an “Unknown device” and it won’t really be identified unless you access the properties, get the hardware ID and search it on Google. However, if you don’t have the time to do this then you can simply jump into installing a driver for the unknown device.
The Device Manager tool allows this and the process is very easy to do. To start, you will need to right-click on the “Unknown device” in order to launch a right-click menu which is also known as a contextual menu. Once this menu appears, just click on the “Update Driver Software…” option in order to launch the “Update Driver Software” wizard which will guide you through the process of installing the right driver for the unknown hardware that you’ve just found.

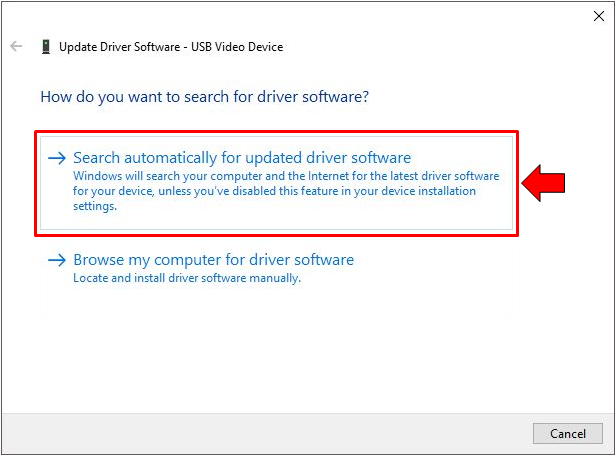
Once the “Update Driver Software” wizard opens, you will see two options in it for installing or updating the driver for the unknown device that you have found earlier. The first option says “Search automatically for updated driver software” which when clicked will help you find the driver from your computer or from the Internet in an automatic manner. The second one which says “Browse my computer for driver software” is the one that you would need to click if you already know what the unknown device actually is but most of the time, the first option is clicked since it is easier to just let Windows do the searching by itself.
Now, we will choose the first option and right after you click on it, the Update Driver Software Wizard will start doing its job of automatically searching for the right driver which might be stored on your computer or if it doesn’t find one that is compatible with the hardware, it will go on and look for the right driver online. Just remember that you need to connect your computer to the Internet so that the wizard can really do its job and fix the hardware that needs a driver.

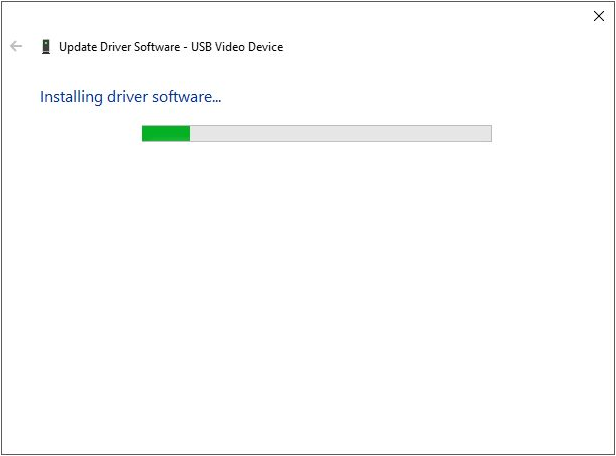
Once the right driver is found, the Update Driver Software Wizard will show that the installing process for it is already in progress as you can see being shown on the screenshot below. You can just continue doing your usual tasks on your computer while the wizard is looking and installing the right driver for the unknown device.
When the search and install process for the right driver is done, the Update Driver Software Wizard will show a message on its Window that the driver installation has been successful and once you see this, you can just click on the button that is found at the bottom-right portion which says “Close” then proceed to looking for the right driver for the other “Unknown devices” that is found on your computer (if there’s any) by following the same process that we have shown above.
The device that you’ve just installed a driver for should now be usable and it should be able to work normally doing its task since it already has the right software that will let it work and communicate with the operating system that is installed on your computer.
Note: Letting Windows 10 look for the driver automatically is the recommended option to choose because installing the wrong driver for a certain hardware can cause further system problems ranging from the hardware not working properly to worst ones like the Blue Screen of Death or BSOD error.
No Comments