Windows
- Restart your Printer services in Windows (Print Spooler issue)
- How to fix Microphone not working on Windows 10?
- How to set up desktop notification for Gmail?
- How to get notified of unread messages in Gmail?
- How to fix blue screen of death (BSOD) on windows 10?
- How to Use Safe Mode to Fix Your Windows PC
- Windows PC troubleshooting
- Blank desktop icons in Windows 7
- Changing Your Windows 10 Default Browser
- How to Identify Unknown Devices using Device Manager
- How to Access and Use Device Manager Tool in Windows 10
- How to Disable or Enable Wireless Network Adapter
- How to Show Hidden Devices in the Device Manager Window
- How to Fix Startup Problems with the Windows Startup Repair Tool
Restart your Printer services in Windows (Print Spooler issue)
Solve Printer issues such as spooler service error, spooler keeps stopping or Printer crashing automatically due to spooler issue.
Follow the below steps:
- Go to the windows search bar and type ‘Task Manager’. Press Enter Key.

- Open services tab in Task Manager
- Then locate Spooler in the services (This is the program which manages your Printer function)
- Right-click on the Spooler
- Click Restart from the options

This should resolve your Printing issue.
Note : If you are not Tech Savvy or not sure/aware of technical stuffs, suggest you to contact your Technical professionals of 13 Tech to handle the situation and provide a solution.
How to fix Microphone not working on Windows 10?
There are different options to fix the issue.
a)Enable Apps to access microphone:

- Locate microphone in the left pane
- Turn on ‘Microphone access for this device ‘ (usually it is on)
- Turn on ‘Allow apps to access your microphone’ (on below you can choose which apps can access your microphone). This process will enable your microphone access for your device

b) Make connected microphone as system default: Go to start menu à Click Settings à Go to System

- locate and click the ‘Sound’ option in the left pane
- scroll down to see ‘Input’ on the right pane
- under ‘choose your input device’ select ‘Microphone’. Also, you can test your microphone right below there.

c) Run the Windows Sound Troubleshooter: Windows System has a built-in troubleshooter that will identify and resolve audio issues automatically. To run this, go to the sound icon on bottom taskbar à right click on speaker iconà click on Troubleshoot sound Problems à Then follow the screen instructions to resolve the issue.
(need to modify the image)
d) Reinstall or Update Microphone drivers: You can uninstall microphone drivers and let Windows install it automatically.
- Search ‘Device Manager’ on Windows search
- Open Device manager
- Expand the ‘Audio input and outputs’ option
- right-click on ‘Microphone’
- click uninstall option
- Then go to start menu and restart the system. While restarting windows will automatically install the missing drivers.
How to set up desktop notification for Gmail?
Open Gmail, Go to Settings
- Go To general Settings
- Identify the option ‘Desktop notifications:’ by scrolling down
- Enable the option ‘New mail notifications on’.

Tip: Sometimes you need to enable google notifications on your Desktop (For this you have to click the link just above the option. Then read and allow the pop-up shown by google)
How to get notified of unread messages in Gmail?
Open Gmail, Go to Settings
- Go to Advanced settings
- identify the option ‘Unread Message Icon’
- Enable it and save changes. This will help you to see a number of unread messages at glance.

How to fix blue screen of death (BSOD) on windows 10?
BSOD can cause due to various issues from hardware complaints to software issues.

This issue mostly occurs due to random reasons. One of the main solutions is to undo your latest action on your PC. This includes removing software recently installed or updating Windows.
If you cannot access the system, then Go to the power button and press shift key.
While pressing on the shift key, click the reset start (on the Power button visible on the window). Then choose the troubleshooting option on the screen.
- Select Troubleshooting

- Go to Advanced options

- Choose Start-up Settings

- Click the restart button on the right corner

After your computer reboots, on the start-up settings menu, push the F5 key on your keyboard to Enable Safe Mode with Networking. In this safe mode, you can follow the below steps to resolve the issue.

Safe mode starts Windows in a basic state, using a limited set of files and drivers. If a problem doesn't happen in safe mode, this means that default settings and basic device drivers aren't causing the issue. Observing Windows in safe mode enables you to narrow down the source of a problem and can help you troubleshoot problems on your PC.
If you can access your PC following the steps below could help you to fix it:
Go to Control Panel

- select Hardware and Sound

- select Power Options

- Select Choose what the Power Buttons Do

- Click Change settings that are currently unavailable à then under Shutdown Settings à toggle Turn on fast startup (recommended) (i.e. turn OFF if it is ON or Turn ON if it is OFF )

This is the first solution if the issue persists then follow the below steps as well:
-
Click Settings

-
Select Apps

(do this step if required)
or

- uninstall any apps you wish to remove (you can also search, sort and filter apps). Some apps may require rebooting the system.

(This is a sample app. Note only remove unwanted apps)
Complete the uninstall by carefully reading any prompts.
- Also Unplug external hardware (printers, scanners etc.)
Another thing to do is to check for windows updates.
- select Update and security

- select windows update on the left pane
- then check for updates.

Then the system will automatically check for updates and install the latest updates. If prompts reboot the system to complete the update.
And if your issue persists, please contact your product manufacturer.
How to Use Safe Mode to Fix Your Windows PC
How to Use Safe Mode to Fix Your Windows PC (and When You Should)

Windows’ Safe Mode is an essential tool. On computers infected with malware or crashing because of buggy drivers, Safe Mode may be the only way to start the computer.
Safe Mode starts your PC with a minimal set of drivers and services. No third-party software or drivers get loaded, and even the built-in Windows stuff is limited to just what’s necessary. Safe Mode is a great way to remove problem-causing software—like malware—without that software getting in the way. It also provides an environment where you may find it easier to roll back drivers, and use certain troubleshooting tools.
When Safe Mode Can Help

When Windows starts normally, it launches startup programs, fires up all the services configured to start, and loads the hardware drivers you have installed. If you start in Safe Mode, Windows uses a very low screen resolution with generic video drivers, doesn’t initialize much hardware support, starts only the necessary services, and avoids loading third-party startup programs.
Sometimes, you can start Windows in Safe Mode when you can’t start Windows normally, making it a good place to start troubleshooting potential problems. If your computer is infected with malware or has unstable hardware drivers that cause blue screens, Safe Mode can help you fix it because those things aren’t loaded the way they are when Windows starts normally.
How to Start Windows In Safe Mode

Your Windows PC should automatically start up in Safe Mode if it crashes more than once while trying to start normally. However, you can also boot into Safe Mode manually:
- Windows 7 and earlier: Press the F8 key while the computer is booting (after the initial BIOS screen, but before the Windows loading screen), and then select Safe Mode in the menu that appears.
- Windows 8: Hold Shift while clicking Restart on the power menu on either the login screen or through the Charms bar menu to begin the process.
- Windows 10: Hold Shift while clicking Restart on the “Power Options” submenu of the Start Menu. Click Troubleshoot > Advanced Options > Startup Settings > Restart. Press the “4” key when you see the Startup Settings screen.
How to Fix Your PC in Safe Mode

After starting Windows in Safe Mode, you can perform most of the regular system maintenance and troubleshooting tasks to fix your computer:
- Scan for Malware: Use your antivirus application to scan for malware and remove it in Safe Mode. Malware that may be impossible to remove in normal mode—because it’s running in the background and interfering with the antivirus—may be removable in Safe Mode. If you don’t have an antivirus installed, you should be able to download and install one in Safe Mode. Of course, if you’re using Windows Defender in Windows 10, you might be better off performing an offline malware scan.
- Run System Restore: If your computer was recently working fine but it’s now unstable, you can use System Restore to restore its system state to the earlier, known-good configuration. Assuming your computer is unstable and crashing, it may be possible to run System Restore without crashing from Safe Mode.
- Uninstall Recently Installed Software: If you recently installed software (such as a hardware driver or a program that includes a driver) and it’s causing your computer to blue-screen, you can uninstall that software from the Control Panel. Your computer should hopefully start normally after you’ve uninstalled the interfering software.
- Update Hardware Drivers: Assuming your hardware drivers are causing system instability, you may want to download and install updated drivers from your manufacturer’s website and install them in Safe Mode. If your computer is unstable, you’ll have to do this from Safe Mode—the hardware drivers won’t interfere and make your computer unstable in Safe Mode.
- See Whether a Crash Occurs: If your computer is unstable normally but works fine in Safe Mode, it’s likely that there’s a software problem causing your computer to crash. However, if the computer continues to crash in Safe Mode, this is often a sign that there’s a hardware problem with your computer. (Note that stability in Safe Mode doesn’t necessarily mean it’s a hardware problem. For example, your graphics card may be faulty and causing crashes under load. However, it may be stable in Safe Mode because your computer isn’t performing demanding operations with it.)
Beyond Safe Mode: Reinstalling Windows

If you are having computer problems, it’s often not a good use of your time to spend hours isolating and fixing them. It may be much faster to reinstall Windows and start over with a fresh system.
• Windows 7 and earlier: Check out our guide to reinstalling Windows from a Windows disc or your computer’s recovery partition.
• Windows 8 or Windows 10: Use the Refresh or Reset your PC feature to restore Windows back to a clean state.
Of course, reinstalling Windows will cause you to lose your personal files, so be sure you have a backup. On Windows 8 or 10, Refreshing your PC will preserve your personal files while replacing the system software.
If your computer continues to be unstable after a full Windows reinstall, your computer’s hardware may be faulty. A complete Windows reinstall rules out any software problems, unless there’s a faulty hardware driver that needs to be updated.
Windows PC troubleshooting
The troubleshooting tips provided here address basic, often-overlooked problems that do not require you to open your computer's case, handle hardware components, or delve deeper into Windows' inner workings. Remember that your goal here is to solve an existing problem, not create a new one. If you feel uncomfortable performing a certain action, contact 13 Tech for solution.
We focus on troubleshooting four common scenarios that occur with Windows-based computers.
- The computer won't power up.
- The computer powers up, but the monitor is blank.
- The computer won't boot from the hard drive.
- Windows won't start up properly
Please bear in mind that these are all generic recommendations. With the huge number of different makes and models of PCs out there, specific troubleshooting steps may vary somewhat. If these steps fail to address the issue you are encountering, you will need to seek advice from 13 Tech or, if your computer is still under warranty, from the manufacturer.
To troubleshoot your computer, follow the steps in each section below in order.
The Computer Won't Power Up
- Is the PC's power cord plugged firmly into a wall socket or power strip, and is the power strip on? If so, try plugging the PC or the power strip into another wall socket. Likewise, check that the power cord is firmly connected to the PC's power-supply outlet.
- Is the power supply (the part on the computer to which the power cord is attached) switched to the "on" position? Does the PC also have a voltage setting, and if it does, did it get changed to an incorrect setting?
- If all the above fails, attach a known working power cord to the PC's power supply. Plug it in and try to power on again.
- Unplug all external devices from the PC, such as printers and scanners, except the monitor. If the computer powers on without the devices, add the peripherals back one at a time until you can identify the problem device.
- For laptops, in addition to the above, remove and reinsert the battery and power the device on without the cord. Most laptop batteries have charge indicator lights. Pressing them will cause them to light up and show how fully charged the battery is. If the indicators do not light up even after the laptop has been plugged in for a while, the battery will need to be replaced. Replacements can be obtained from the manufacturer or online through third-party resellers. If you buy from an online retailer, make sure that you confirm that the replacement is for your specific laptop model. Laptop batteries must fit each specific model exactly.
The Computer Powers Up, but the Monitor Is Blank
- Is the monitor plugged firmly into a working wall socket or power strip, and is the power strip turned on? If so, try plugging the monitor or power strip into another wall socket.
- Is the monitor's power button switched to the "on" position?
- Are the monitor's brightness and contrast controls properly adjusted?
- Check both ends of the video cable for bent pins. If they are bent, straighten them with a needle-nose pliers. This applies to VGA and DVI cables.
- Check to see that the video cable is plugged firmly into the back of the monitor and that the pinned end is tightly screwed into the video output on the back of the computer's case.
- If that doesn't work, try removing the existing cable and replacing it with a known working one.
- Borrow a working monitor from another PC and hook it up. If the monitor doesn't work, your video card may not be working, and you will probably need a professional to diagnose the problem more closely.
The Computer Won't Boot from the Hard Drive
- Make sure there are no DVDs or flash drives inserted in the computer.
- Remove all external drives or devices and try restarting the computer.
- If you receive a series of beeps or error messages, write them down, as they could be instrumental in diagnosing your problem. Beep codes vary by manufacturer, so consult your BIOS (basic input/output system) documentation if you have it for more in-depth information on what those beeps mean. You can also get that information from the manufacturer support page for that model.
- If you get a specific error message, copy the error message into a search engine. You may be able to diagnose the problem that way. Don't buy or download software advertised for it, though.
- For older computers without a solid-state hard drive (SSD), listen to make sure your hard drive is spinning. If you hear a clicking sound, your hard drive no longer works, and you will need to replace it.
- Many newer computers have SSDs, which don't spin. On those machines, look to see if the hard drive light is flashing. If the hard drive light is flashing, but the computer doesn't start up, power the device off and then restart. If the hard drive light doesn't flash, that is an indicator that it has failed.
- If none of the above works, check to see if the computer is under warranty. If it is, call the manufacturer for tech support.
If none of those options apply, you will likely need to get 13 Tech for professional help.
Windows Won't Start Up Properly
- Make sure there are no DVDs or flash drives inserted in the computer.
- Remove external drives or devices and then try restarting the computer.
- If Windows seems to start booting but fails partway through, you may be able to fix it with a Windows 7 Startup Repair operation or a Windows 10 Startup Repair operation. If you're not given the option to do a startup repair at boot-up, insert a Windows installation disc or recovery disk and use the startup repair tool from there.
- If you cannot boot into Windows at all, use the computer manufacturer's default recovery procedures to recover the drive and reset Windows to its original configuration. After that is complete, you will also need to restore your data, if you have backed it up.
If all else fails, you may want to reinstall Windows.
Beyond Troubleshooting
If your troubleshooting is not successful, don't hesitate to contact the computer manufacturer if the device is under warranty, or to get professional help from 13 Tech.
Blank desktop icons in Windows 7
This usually occurs due to a software or application recently installed causing an conflict with the file IconCache.db. Follow the simple steps below to easily resolve this issue.
First, click the "Start" button and then click on "Computer".

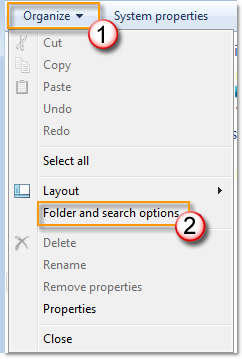
Now click "Organize" and then click "Folder and Search Options".
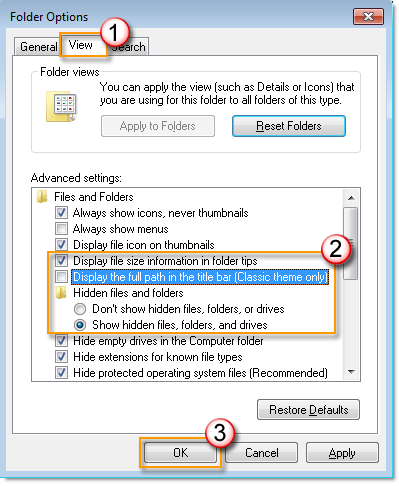
Now, click "View", uncheck "Hide extensions for known file types" and "Hide protected operating system files (Recommended)" and check "Show hidden files, folders, and drives". When done, click "OK". (Click "Yes" ,if a warning window appears.)
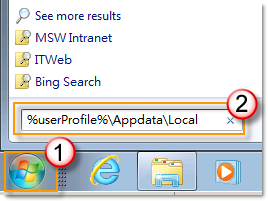
Now click the "Start" button and type %UserProfile%\Appdata\Local as shown below. Once done, press the Enter key on the keyboard.
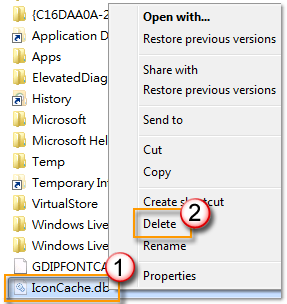
Right click on "IconCache.db" and then click "Delete". Restart your computer, and the issue will be resolved.
Note : If you are not Tech Savvy or not sure/aware of technical stuffs, suggest you to contact your Technical Professionals of 13 Tech to handle the situation and provide a solution.
Changing Your Windows 10 Default Browser
Having a built-in web browser doesn’t mean that you are limited to using just one browser. You can actually install other browsers to your machine like the most popular third-party ones known as Google Chrome and Mozilla Firefox. In fact there is a Safari browser that works with Windows and another third-party browser called Opera which boasts its being light on system resource.
You might have heard of the other web browsers that are available for free download on to your device but the question is how do you set it as your machine’s default browser when you are using the latest version of Windows 10
The very first thing that you need to do is to install the third-party browser that you want to be set as the default one for your Windows 10 machine. You can choose either Google Chrome, Mozilla Firefox or any other browser that you want and be sure to install the version that works with your Windows 7 system type (whether it is 32-bit or 64-bit).
Once you are done downloading the browser that you want, you can go ahead and install it so you can proceed to the next step which is setting it as the default web browser for your Windows machine.
2 Ways in Changing Your Default Browser
- Changing the Default Browser From Its Settings Section
After you install the third-party browser that you wish to use as your machine’s default browser, it would automatically open and ask you to go through some simple setting up steps. This would help prepare your browser to work as you want it to and most browsers would even allow you to import browsing history, contacts and other data stored in your previous default web browser to the newly installed one.

If you installed Google Chrome and you want to set it as default browser, it would automatically tell you that it is currently not your default browser and a button that says “Set as default” will appear on the right portion as shown on the screenshot above. From here, all you need to do is click on the button itself and you are done setting it as your machine’s default web browser.
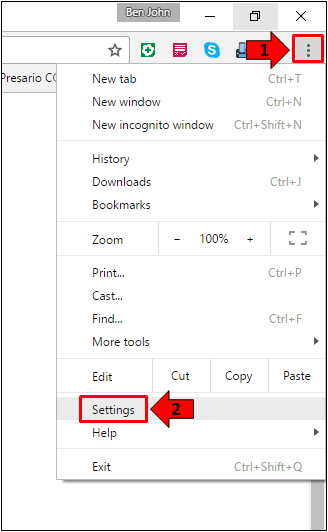
If this prompt does not appear, you can go ahead and access the Settings section of the browser that you want to be set as default. In Google Chrome, you will need to click on the 3-dotted button that is found at the top-right portion of an active Chrome Window then from the options box that will appear, you will need to click on the link that says “Settings” as you can see below.
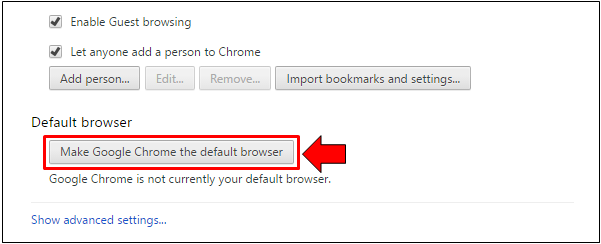
After you do so, a new tab will open and show the “Settings” section for Google Chrome. From here, all you need to do is scroll down until you reach the “Default browser” section where you will need to click on the button that is labeled “Make Google Chrome the default browser” as you can see being highlighted on the screenshot below.
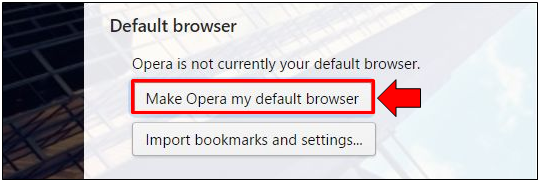
Other browsers will also have the same button or a similar option available in their setting section such as the one that you see below from Opera Web Browser. If you want to set a third-party as default then this is the easiest method that you can use since it doesn’t require you to leave the browser Window.
- Changing the Default Browser from the Settings App
Microsoft has created a hybrid operating system and named it Windows 8 then further improved it to Windows 8.1 and now Windows 10. This operating system version contains the traditional Desktop environment combined with the Mobile interface which used to be found only in mobile devices. If you’ve already tried using Windows 8, Windows 8.1 or Windows 10 then you should be aware of the existence of the Control Panel’s modern counterpart called the universal Settings app.

To launch this feature, all you need to do is click on its icon from the narrow vertical bar at the left hand portion of the Start Menu. You would first need to launch the Start Menu of course by clicking on the Start Button that is found at the extreme-left end of the Taskbar or by pressing the Windows Key then click on the icon which you can see being highlighted on the screenshot above.
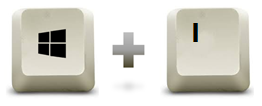
Most of us want shortcuts and Microsoft is aware of it and so they made a keyboard shortcut available for launching the universal Settings app. Just press the Windows + I keys on your machine’s keyboard and the Settings app should launch instantly!
The next step will now require you to access the “Default app settings” section and in order to access this quickly, just type the word “default” into the search input box that is found at the top-center portion of the Settings app homepage Window as shown below.
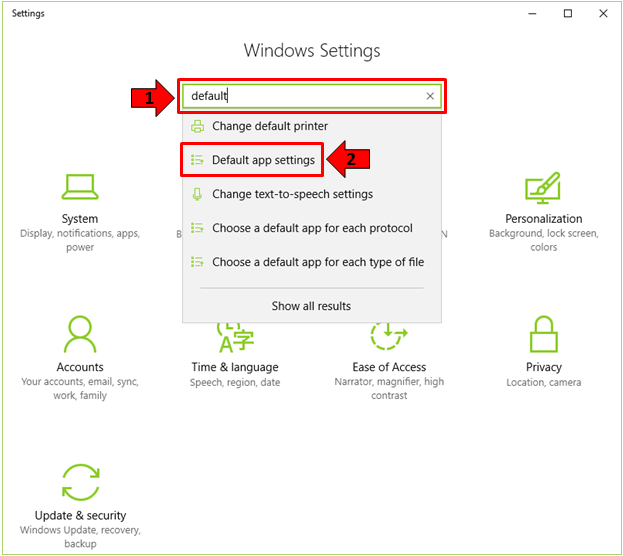
After typing the word “default” into the search box, the search suggestions should appear just below it and from here, you should be able to see “Default app settings” which you will need to click so you can be directed to the section where you can change the default web browser that your computer currently has. The “Default app settings” section looks exactly like the one that is shown on the screenshot below and in order to change the default browser, you will need to scroll down to the “Web browser” item then click on the web browser that is currently being displayed under it.

After clicking on the browser under the “Web browser” section of the “Default app settings” Window, an options box will appear which is labelled “Choose an app” and from here, all you need to do is choose and click the new browser that you want to set as default as you can see on the screenshot above. Clicking on the browser of your choice applies the change automatically without requiring you to click on any other buttons so you should now start to enjoy browsing using the new web browser that you have installed to your Windows machine.
Note : If you are not Tech Savvy or not sure/aware of technical stuffs, suggest you to contact your Technical Professionals of 13 Tech to handle the situation and provide a solution.
How to Identify Unknown Devices using Device Manager
A driver is a software that makes an installed or attached hardware work. Without the proper driver, a hardware would not work since it won’t be able to have a software that will communicate with the operating system.
How to Access Device Manager Tool in Windows 10
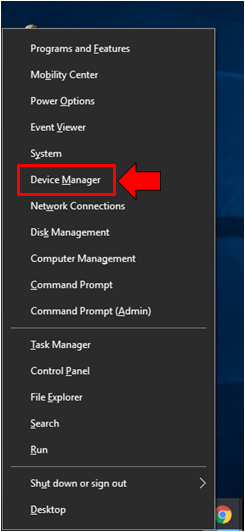
To launch this, all you need to do is press the Windows + X keys and the menu should appear on the bottom-left portion of your computer screen as you can see on the screenshot below.

How to Identify Unknown Devices
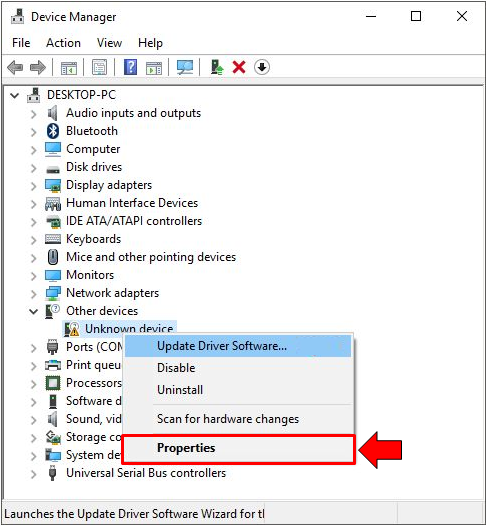
When the Update Driver Software Wizard fails to find and install the right driver for an unknown device that you found on your computer, the first thing that you need to do in order to find the driver that will make this hardware work is to identify the hardware first. You can do this by right-clicking on the “Unknown device” item that is listed in the Device Manager Window and on the right-click menu that would appear, simply hit the option that says “Properties”.
After the “Properties” option is clicked, you will then be able to launch a small Window which contains tabs on top of it showing some information about the Unknown device. In order to really identify what the device is, you will need to click on the “Details” tab that is found on top of the “Unknown device Properties” Window and under it, just click on the drop-down options box under the “Property” section and select “Hardware Ids” from the list that would appear.
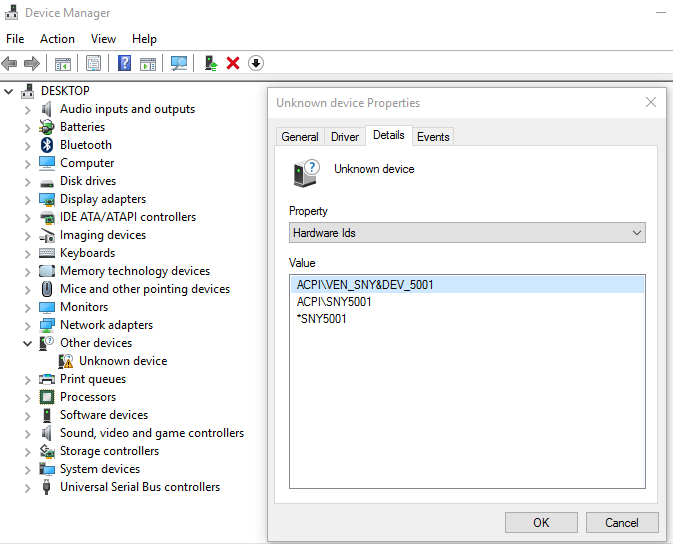
The identifying values for the hardware will then appear inside the “Value” box and all you need to do is copy one of these values then open your favourite browser and search for it using Google Search or any other Search engine. Doing this will help you identify what the device is and even lead you to find the official website of its manufacturer so that you can get the right driver for it.
Note : If you are not Tech Savvy or not sure/aware of technical stuffs, suggest you to contact your Technical Professionals of 13 Tech to handle the situation and provide a solution.
How to Access and Use Device Manager Tool in Windows 10
A driver is a software that makes an installed or attached hardware work. Without the proper driver, a hardware would not work since it won’t be able to have a software that will communicate with the operating system.
How to Access Device Manager Tool in Windows 10
To launch this, all you need to do is press the Windows + X keys and the menu should appear on the bottom-left portion of your computer screen as you can see on the screenshot below.
How to Find Devices that Lack Driver in Device Manager
Finding hardware that don’t have the right driver installed is very easy if you use the Device Manager tool. After all, it is meant to do this and is designed to detect malfunctioning or non-functioning hardware so you can find and install the right driver for them or fix any problem that a certain system component/hardware is currently having. To look for these useless hardware (those that lack drivers to work), you will simply need to look for an item on the list of all the hardware attached or built-in with your computer which is labelled “Other devices” as you can see on the screenshot below.
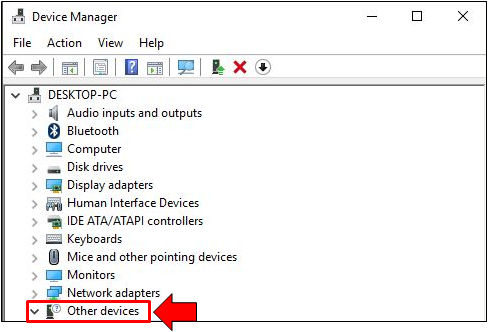
Clicking on this “Other devices” item from the list will cause it to expand and show all the hardware that currently don’t have the proper driver for them to work. These devices should be labelled as “Unknown device” as shown below and its icon should have a yellow triangular overlay on it that contains an exclamation mark in it.
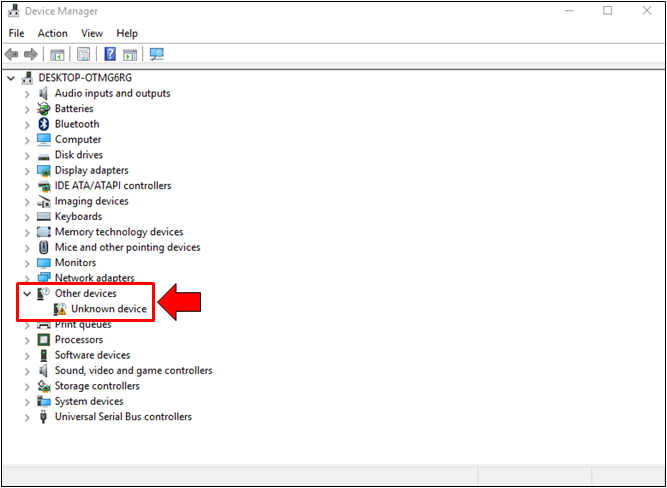
If your computer has all the required drivers for all the hardware that it has, this “Other devices” item should not appear anywhere in this list but if you found it after you launched the Device Manager tool in your Windows 10 machine, it means that there is something that is built-in or attached to your computer which needs a driver and you will need to install the drive itself for the hardware to work. If you don’t have a clue on how this is done, we’re going to show the steps next so just read on.
How to Install Driver for an Unknown Device
As we have mentioned earlier, finding the “Other devices” item from the list of hardware that is attached or built-in with your computer means that there is something that needs a driver. The hardware will just appear as an “Unknown device” and it won’t really be identified unless you access the properties, get the hardware ID and search it on Google. However, if you don’t have the time to do this then you can simply jump into installing a driver for the unknown device.
The Device Manager tool allows this and the process is very easy to do. To start, you will need to right-click on the “Unknown device” in order to launch a right-click menu which is also known as a contextual menu. Once this menu appears, just click on the “Update Driver Software…” option in order to launch the “Update Driver Software” wizard which will guide you through the process of installing the right driver for the unknown hardware that you’ve just found.

Once the “Update Driver Software” wizard opens, you will see two options in it for installing or updating the driver for the unknown device that you have found earlier. The first option says “Search automatically for updated driver software” which when clicked will help you find the driver from your computer or from the Internet in an automatic manner. The second one which says “Browse my computer for driver software” is the one that you would need to click if you already know what the unknown device actually is but most of the time, the first option is clicked since it is easier to just let Windows do the searching by itself.
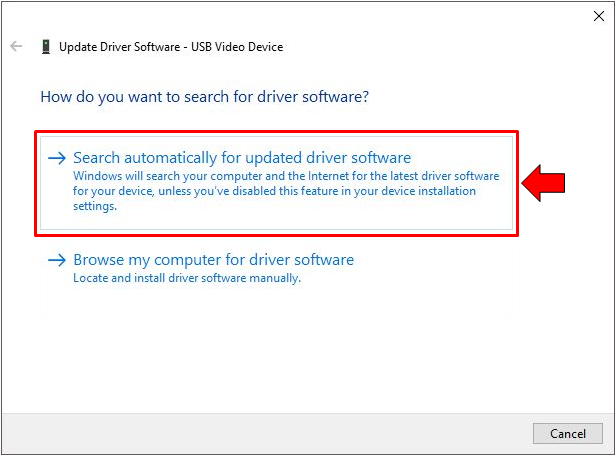
Now, we will choose the first option and right after you click on it, the Update Driver Software Wizard will start doing its job of automatically searching for the right driver which might be stored on your computer or if it doesn’t find one that is compatible with the hardware, it will go on and look for the right driver online. Just remember that you need to connect your computer to the Internet so that the wizard can really do its job and fix the hardware that needs a driver.

Once the right driver is found, the Update Driver Software Wizard will show that the installing process for it is already in progress as you can see being shown on the screenshot below. You can just continue doing your usual tasks on your computer while the wizard is looking and installing the right driver for the unknown device.
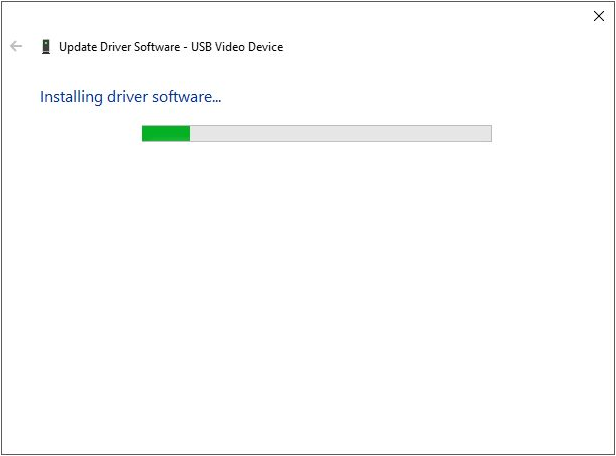
When the search and install process for the right driver is done, the Update Driver Software Wizard will show a message on its Window that the driver installation has been successful and once you see this, you can just click on the button that is found at the bottom-right portion which says “Close” then proceed to looking for the right driver for the other “Unknown devices” that is found on your computer (if there’s any) by following the same process that we have shown above.
The device that you’ve just installed a driver for should now be usable and it should be able to work normally doing its task since it already has the right software that will let it work and communicate with the operating system that is installed on your computer.
Note: Letting Windows 10 look for the driver automatically is the recommended option to choose because installing the wrong driver for a certain hardware can cause further system problems ranging from the hardware not working properly to worst ones like the Blue Screen of Death or BSOD error.
How to Disable or Enable Wireless Network Adapter
There are times that a certain hardware would not work and in our experience using Windows through the years, it is the wireless network adapter that suffers this kind of problem in most cases. If you noticed that your machine is having problems with your wireless network connection even if there is actually Internet connection then you might need to restart the hardware which is the wireless network adapter on your machine and you can do this by using the Disable/Enable options that is found in the Device Manager Window.
To launch Device Manager Window, all you need to do is press the Windows + X keys and the menu should appear on the bottom-left portion of your computer screen as you can see on the screenshot below.

To start, you will first need to locate the Wireless Network Adapter device on the list of devices. It is found under the “Network Adapters” item so go ahead and expand it. After doing so, you should be able to find your machine’s wireless network adapter as you can see on the screenshot below (although yours might be of different brand) and once you locate it, simply right-click on it to pull up the right-click menu.
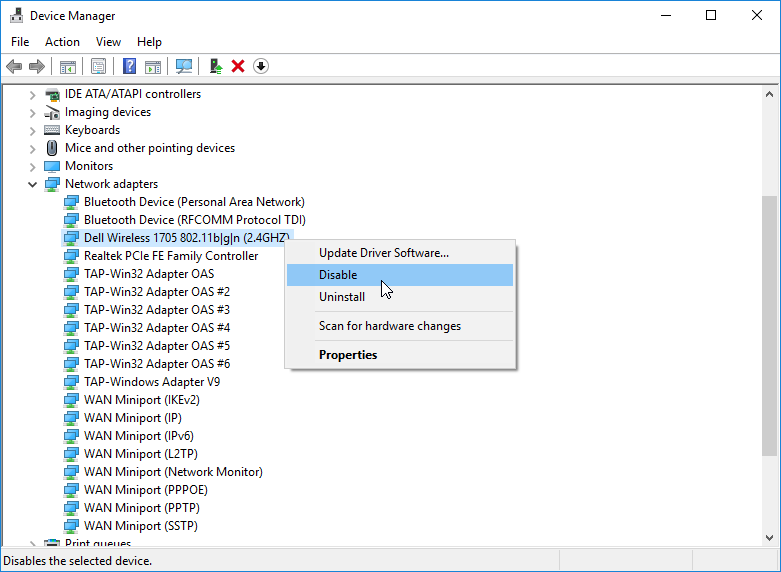
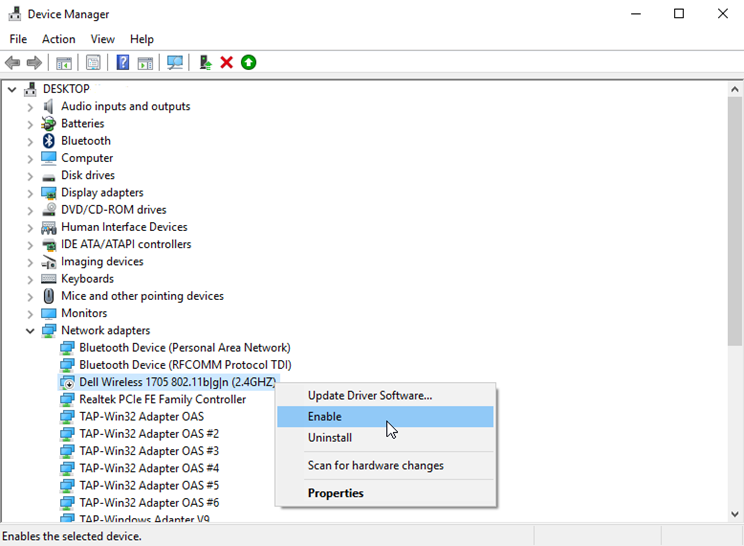
Once the right-click menu appears, you will simply need to click on the option that says “Disable” and what would happen next is that your network connection would be lost in case it is the wireless network adapter that you’ve disabled just like what we are showing in this tutorial. In order to fix the problem, you will simply need to right-click on the same device again and from the right-click menu that would appear, just click on the option that says “Enable” as shown on the screenshot below.
In most cases, doing this disable then enable trick for a certain hardware like the Wireless Network Adapter fixes a problem. If it didn’t work on your computer then you’ll need to inspect your Wi-Fi router or contact your Internet Service Provider because the problem might already be with them and not on the hardware that is installed on your computer.
Note : If you are not Tech Savvy or not sure/aware of technical stuffs, suggest you to contact your Technical Professionals of 13 Tech to handle the situation and provide a solution.
How to Show Hidden Devices in the Device Manager Window
Now, not all of the devices in your computer are listed or allowed to appear on the Device Manager Window by default. There are others that are hidden and if you want to view these hidden devices, all you need to do is to follow the steps that are shown below.
To launch Device Manager Window, all you need to do is press the Windows + X keys and the menu should appear on the bottom-left portion of your computer screen as you can see on the screenshot below.

Then, you will need to click on the tab that is found on the top-right portion of the Device Manager Window which says “View” and after doing so, a set of options will appear as you can see being shown on the screenshot below.
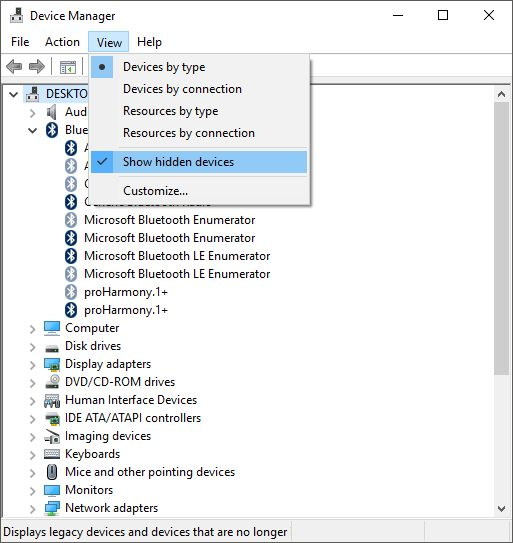
From the set of options that appeared inside a box as you have seen above, all you need to do is click on the “Show hidden devices” option that is found near the bottom of the box and voila! All legacy devices as well as those that are no longer attached to your computer will appear on the list according to where they belong. This is useful trick that you can do especially if you want to trace which device that was recently attached to your computer caused certain problems that suddenly appeared on your machine.
Note : If you are not Tech Savvy or not sure/aware of technical stuffs, suggest you to contact your Technical Professionals of 13 Tech to handle the situation and provide a solution.
How to Fix Startup Problems with the Windows Startup Repair Tool
If Windows isn’t starting properly, you can often use the integrated “startup repair” tool to fix it. This recovery tool will scan your PC for problems like missing or damaged system files. It can’t fix hardware issues or Windows installation problems, but it’s a great first place to start if you’re experiencing trouble booting into Windows.
This tool is available on Windows 7, 8, and 10. You can access it from the built-in Windows recovery tools (if they built properly), recovery media, or a Windows installation disc.
Launch Startup Repair From the Windows Boot Menu
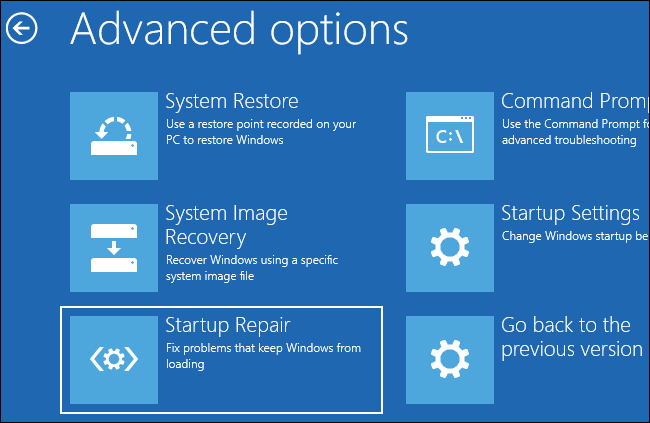
On Windows 8 or 10, you’ll often see the advanced boot option menu if Windows can’t boot properly. You can access Startup Repair by clicking Troubleshoot > Advanced Options > Startup Repair on this menu.
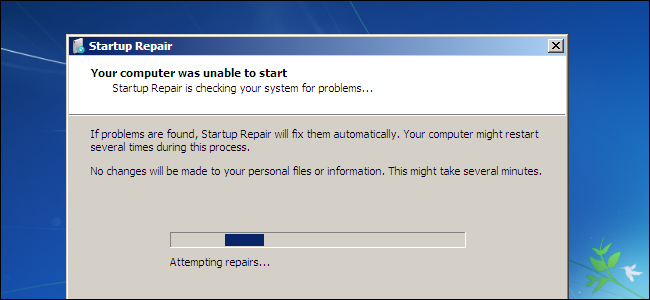
Windows will ask you for your password and attempt to automatically repair your PC.
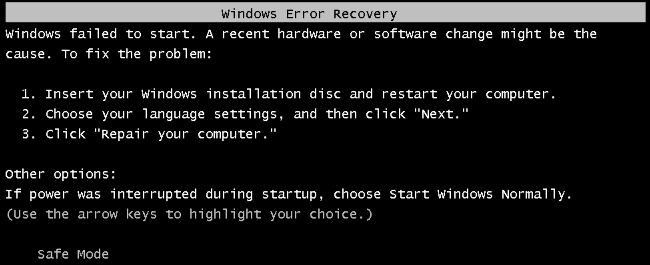
On Windows 7, you’ll often see the Windows Error Recovery screen if Windows can’t boot properly. Select “Launch Startup repair (Recommended)” on this screen to run startup repair.
Windows will prompt you for your keyboard layout and a username and password for your PC. After it does, select the “Launch Startup Repair (recommended)” option. Windows will attempt to find and fix problems that can prevent your PC from booting.

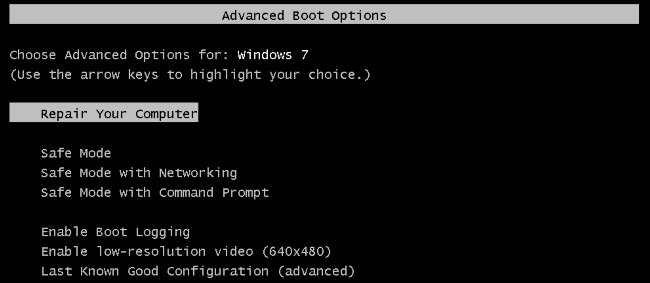
If Windows 7 won’t boot properly and doesn’t show you the Error Recovery screen, you can get into it manually. First, power the computer completely down. Next, turn it on and keep pressing the F8 key as it boots. You’ll see the Advanced Boot Options screen, which is where you would launch Safe Mode from. Select “Repair Your Computer” and run startup repair.
In some cases, the startup repair option in Windows 7 may not be available. You may be told you need to use a Windows installation disc to repair your computer instead.
Launch Startup Repair From a System Repair Disc or Recovery Drive
If Windows isn’t booting properly and won’t even allow you to use the startup repair option at boot, you can run startup repair from a system repair disc or recovery drive.
If you haven’t already created a system repair disc or recovery drive, you can do so from another computer running the same version of Windows that is booting properly. For example, if your Windows 7 PC isn’t booting properly, you can create a recovery disc on another PC running Windows 7 and use it to fix the problem.
How to Boot Your Computer From a Disc or USB Drive
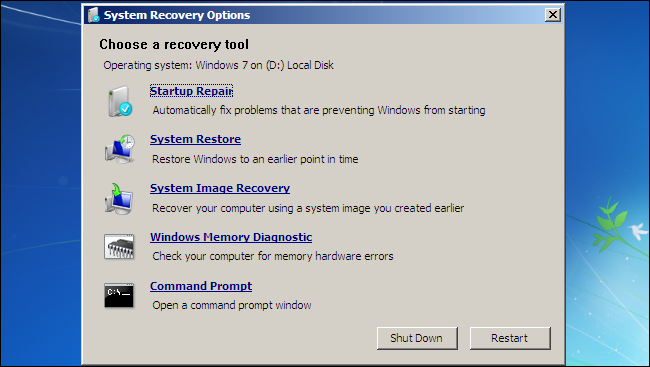
Once you’ve created a system repair disc or recovery drive, insert it into the PC that isn’t booting properly and boot from the disc or USB drive. You’ll be prompted to choose an installed version of Windows and you’ll see the same tools you could normally access from the boot menu. Select “Startup Repair” to run a startup repair operation.
This recovery media will also allow you to use System Restore, recover your computer using a system image backup you’ve previously created, and run a Windows Memory Diagnostic to check your computer’s RAM for problems.
Launch Startup Repair From Windows Installation Media
If you don’t have Windows installation media lying around, you can download a Windows 7, 8, or 10 ISO from Microsoft and either burn it to disc or copy it to a USB drive. It’s completely legal.
Be sure to use media that matches the version of Windows you’re trying to recover—for example, Windows 10 installation media for a Windows 10 PC or Windows 7 installation media for a Windows 7 PC.
Insert the disc or USB drive into the computer that can’t boot properly and boot from the device.
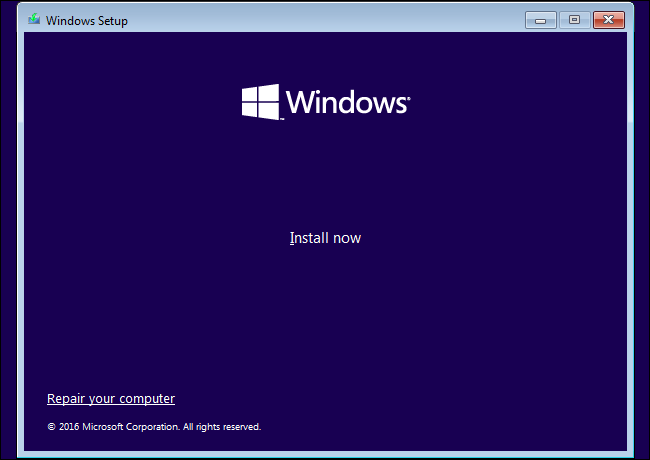
On Windows 8 or 10, click the “Repair your computer” option instead of “Install now” in the installer screen. Then select Troubleshoot > Startup Repair to run startup repair.
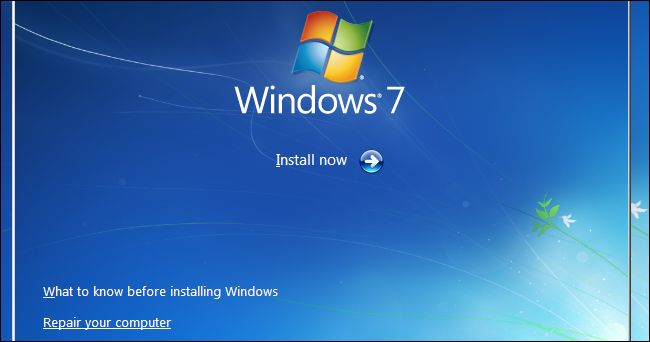
On Windows 7, you’ll see a “Repair your computer” link in the same place. Click this and Windows will run the startup repair tool.
This tool won’t fix every problem. In some cases, your Windows installation may be so damaged that reinstalling Windows is the only option. In other cases, even reinstalling Windows may not solve your problem, as it may be a physical problem with your PC’s hardware.
Note : If you are not Tech Savvy or not sure/aware of technical stuffs, suggest you to contact your Technical Professionals @ 13 Tech to handle the situation and provide a solution.